> For the complete documentation index, see [llms.txt](https://redirectmais.gitbook.io/central-de-ajuda/llms.txt). Markdown versions of documentation pages are available by appending `.md` to page URLs; this page is available as [Markdown](https://redirectmais.gitbook.io/central-de-ajuda/redirect+-notify/integracoes-disponiveis/kirvano.md).
# Kirvano
### 1️⃣ Primeiro passo
No seu painel do Redirect+ Notify, clique em "Nova Integração".
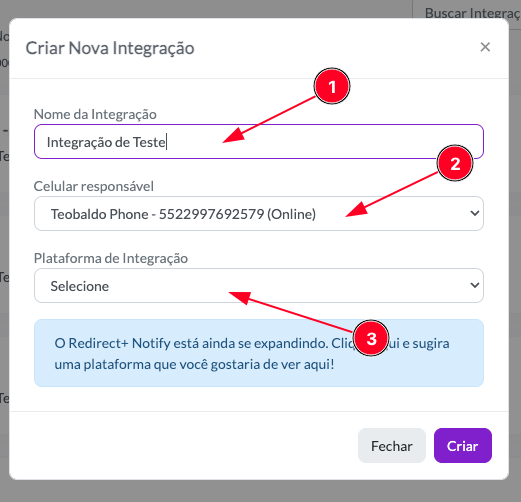
Na janela que se abriu, preencha os campos da seguinte forma:
* Em **Nome da Integração (1)**, preencha um nome identificador para a sua integração;
* Em **Celular Responsável (2)**, selecione o celular que ficará responsável por enviar as notificações via WhatsApp para seus leads.
* Em **Plataforma de Integração (3)**, selecione a plataforma que você deseja integrar. Nesse caso, escolheremos a Kirvano.
Clique no botão criar.
Após ter salvo sua integração, clique no botão em cima do card da sua integração e selecione a opção "Configurar". Clique para copiar o link que a Redirect+ fornece, conforme as imagens abaixo ilustram.
### 2️⃣ Segundo passo:
Abra o seu painel na Kirvano e no menu lateral selecione e opção **Integrações(1)** e clique em **Webhook(2)**.
{% hint style="danger" %}
Importante: é necessário que você tenha [criado o seu produto](https://help.kirvano.com/pt-BR/articles/8032525-cadastrando-o-seu-produto) previamente na Kirvano.
{% endhint %}
### 3️⃣ Terceiro passo:
Na próxima tela, clique em +Criar Webhook**.**
Após isso, na tela seguinte, preencha os seguintes campos:
👉 Em **Nome da Integração (1)**, informe o nome do webhook.
👉 Em **URL da Integração (2)**, cole a URL que você copiou no painel da Redirect+ conforme o passo 1 deste tutorial.
👉 Em seguida na parte de **Evento**, selecione os seguintes eventos:
* Boleto Gerado
* Carrinho Abandonado
* PIX Gerado
* Compra Recusada
* Reembolso
* Compra Aprovada
Por fim clique em Salvar:
E pronto! A Redirect+ já começará a receber as informações. Você pode verificar pelo seu painel na Redirect+ os eventos recebidos pela sua integração pelo botão "Ver Eventos".